Quick Start
Download
Focus Mode
Font Size
Product Overview
What Is WorkBuddy AI
WorkBuddy AI is a full-scenario AI agent desktop workspace for professionals, built by Tencent. Describe what you need in a single sentence, and WorkBuddy AI plans and executes complex tasks on its own - like a colleague - then delivers results you can review and use.
Unlike traditional conversational AI products, WorkBuddy AI not only understands natural language but also autonomously plans and executes tasks, directly operates local files, and turns requirements into deliverable results.
Core strengths
Assign Tasks in One Sentence: Describe your requirements in natural language without complex operations.
Autonomous Planning and Execution: Automatically breaks down tasks, plans steps, and completes delivery.
Multitasking: Supports launching and managing multiple tasks simultaneously, making it suitable for parallel processing.
Local File Operations: Reads authorized computer folders for batch processing.
Acceptable Results: Generated documents, spreadsheets, PPTs, and other deliverables can be used directly.
Scenarios
Daily Office Work (Default Mode)
Document Generation: Generates work reports, technical documents, README files, and more.
Data Analysis: Upload data files for automatic analysis and visualization.
PPT/Report Generation: Generates presentations and reports from requirement descriptions.
Deep Research: Conducts in-depth research on complex issues and generates reports.
Office scenarios such as email editing and weekly report generation.
Batch File Processing: Automatically organizes, renames, and converts file formats.
Code Development
Daily Coding Assistance: Code generation, code review, Bug fixes, and refactoring optimization.
Project Understanding: Quickly understand the architecture and logic of unfamiliar codebases.
Website/Application Development: Full-process assistance from requirements to code.
Environment Requirements
Network: A network connection is required to call AI model services.
Account: You have registered and logged in to your WorkBuddy AI account.
Accessing WorkBuddy AI
1. Launch WorkBuddy AI to open the main interface.
2. If you have not logged in yet, the system will display a login guide page. Click the Login button to complete the login.
Starting Your First Task
1. Once you are in WorkBuddy AI, you will see the new task page, which includes a greeting, a mode switch, skill shortcuts, and the input box.
2. You can switch between Daily Office and Code Development modes at the top of the page, with Daily Office as the default.
3. Describe your requirements in one sentence in the input box, for example:
''Generate an analysis report based on this sales data for me.''
''Organize the images in this folder and rename them by date.''
''Generate a PPT based on this requirements document.''
4. In the input box, type @ to reference conversation files and / to invoke skills and commands.
5. You can select the AI model in the lower-right corner of the input box.
6. Below the input box, you can set Select Workspace and Default Permissions.
7. Click the Send button or press Enter, and WorkBuddy AI will start executing the task autonomously.
8. You can start additional tasks so several run in parallel, and switch between them in the sidebar at any time.
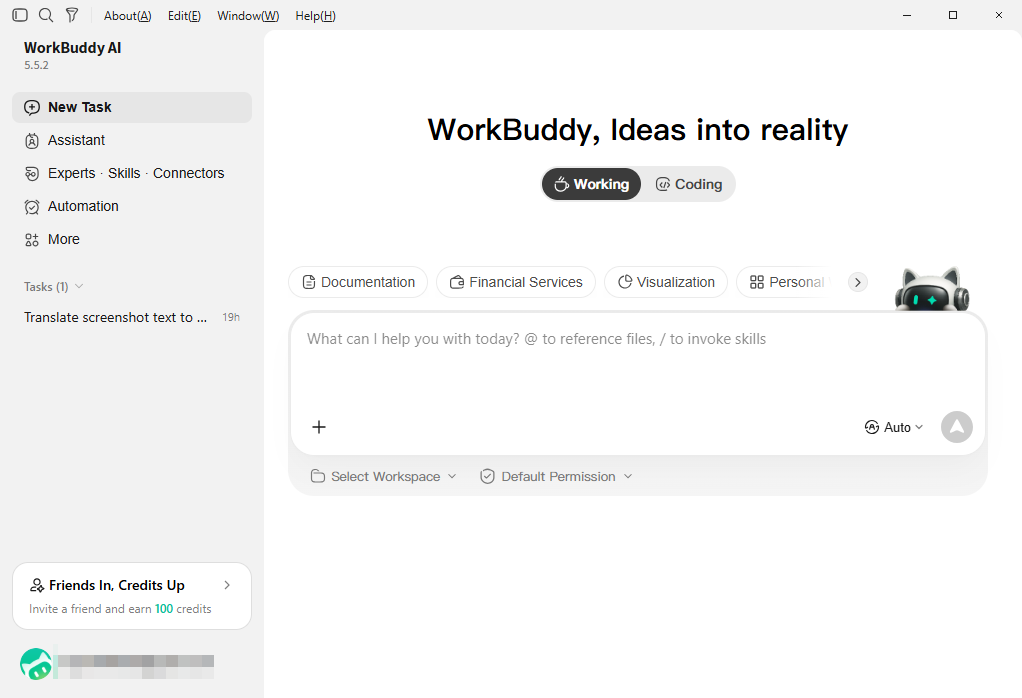
Overview of Regional Features
Area | Function |
Sidebar | The upper section holds the main entry points: New Task, Assistant, Experts · Skills · Connectors, Automation, and More. The lower section lists your Tasks and Spaces, with search and management options. Your avatar appears at the bottom. |
Conversation Area | The main workspace, containing the task title bar, the message list, and the input box. |
Results Panel | The panel on the right, showing artifacts, workspace files, changes, and previews. Use the toggle in the task title bar to expand or collapse it. |
Help and Support
Was this page helpful?
You can also Contact sales or Submit a Ticket for help.
Help us improve! Rate your documentation experience in 5 mins.
Feedback