Calling Hunyuan API via AI Gateway
Download
Focus Mode
Font Size
Invoking Hunyuan APIs through AI Gateway centrally manages access to multiple AI models via a unified interface, enabling efficient, secure, and scalable AI capability integration. It simplifies the Hunyuan API invocation process and provides one-stop services including traffic control, monitoring, and billing. This document quickly guides you through the initial configuration to experience the complete workflow of invoking Hunyuan large model services via AI Gateway. You will sequentially configure the model key, model service, and model API, create the caller identity (consumer and consumer group), and finally successfully initiate the invocation through the gateway.
Prerequisites
1. The AI gateway instance has been created. For specific operations, see Create AI Gateway.
2. You have obtained the API key for the Hunyuan large model from the official Hunyuan platform.
Operation Overview
The core operational procedure is as follows. You will complete the following six steps in sequence:
1. Create a Model Key: Securely configure the API key required for accessing Hunyuan in the gateway.
2. Create a Model Service: Add Hunyuan as the AI model provider and associate it with the key created in the previous step.
3. Create a Model API: Create an API that provides text generation capabilities externally and bind it to the service created in Step 2.
4. Create a Consumer: Create a caller that represents your own application and add identity credentials (API Key) for it.
5. Create a Consumer Group and Authorize It: Group the consumers and grant the group permission to access the model API created in Step 3.
6. Obtain the Address and Initiate the Call: Locate the API access address in the console and initiate the call request using the consumer's credentials.
Next, complete each step by following the detailed instructions below.
Operation Steps
Step 1: Creating a Model Key
A model key is used to securely store and manage the credentials required for accessing third-party large model services.
1. Log in to the Microservices Platform console. In the left sidebar, select AI Gateway, choose the instance you need to use, and go to the instance details.
2. In the left sidebar, click Key Management.
3. On the Key Management page, click New.
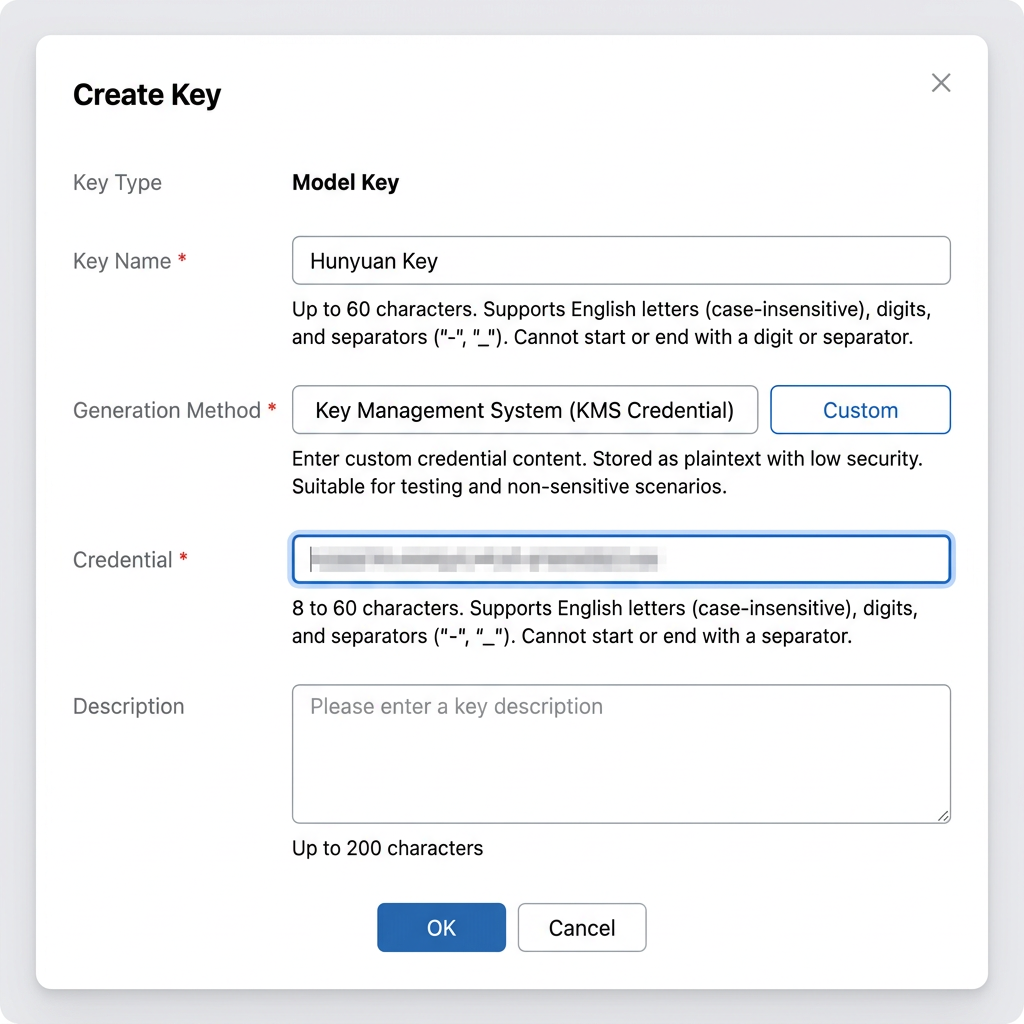
4. In the Create Key window, configure the key information by referring to the table below.
Parameter | Description |
Key Type | Select Model Key. |
Key Name | Custom name, such as hunyuan-key. |
Generation Method | Select Custom. |
Credential Content | Enter the API key you obtained from Hunyuan here. |
Description | (Optional) Enter description. |
5. Click OK to complete the key creation.
Step 2: Creating a Model Service
A model service is used to encapsulate the invocation configuration for a specific large model vendor (Hunyuan in this case).
1. In the left sidebar, click Model Management > Model Service.
2. On the Model Service page, click New.
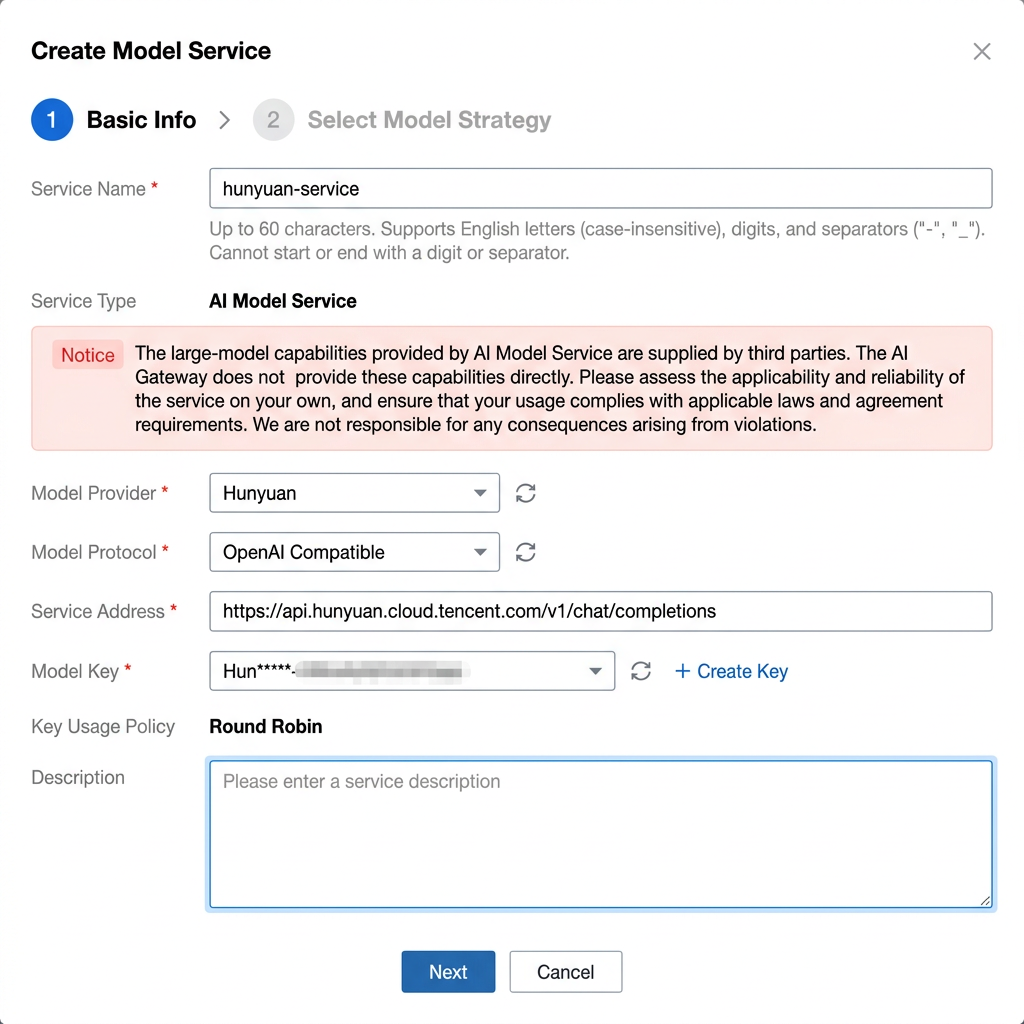
3. In the Create Model Service window, go to the Basic Information step and configure the settings by referring to the following content.
Parameter | Description |
Service Name | Specify a custom name, such as hunyuan-service. |
Service Type | Fixed to AI Model Service. |
Model Vendor | Select hunyuan. |
Model Protocol | Select OpenAI Compatible. |
Service Address | The system will automatically populate the official endpoint address for Hunyuan. |
Model Key | Select the key (hunyuan-key) you created in Step 1 from the drop-down list. |
Key Usage Policy | Select Polling. |
4. Click Next to go to the Select Model Policy step.
Model Selection Method: Keep the default specified model.
Default Model: Select a Hunyuan model, such as HY-3, from the drop-down list.
5. Click OK to complete the model service creation.
Step 3: Creating a Model API
The Model API is the invocation endpoint exposed by the gateway. Clients access this API to utilize large model capabilities.
1. In the left sidebar, click Model Management > Model API.
2. On the Model API page, click New.
3. In the Create Model API window, go to the Basic Information step and configure the settings by referring to the following table.
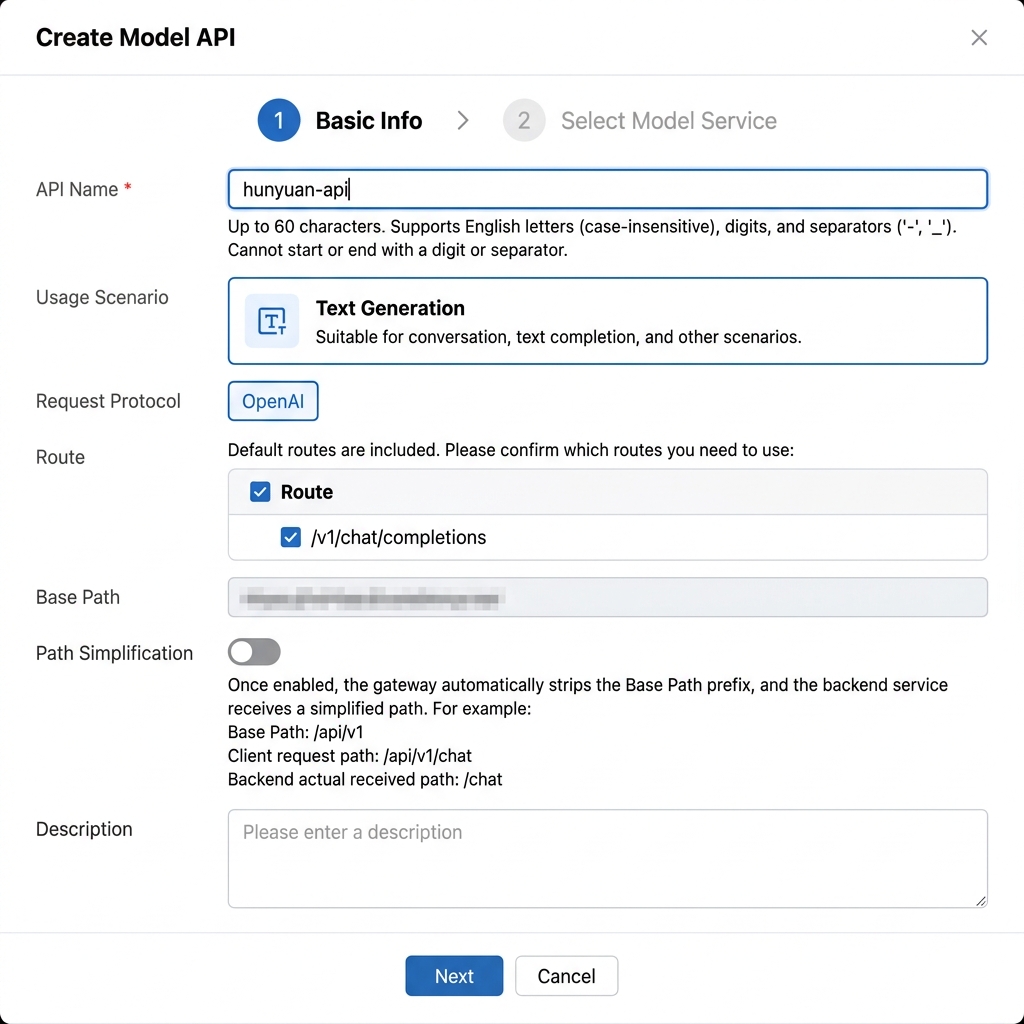
Parameter | Description |
API Name | Custom name, such as hunyuan-api. |
Use Case | Select Text Generation. |
Request protocol | Select OpenAI. |
Route | /v1/chat/completions is selected by default. Please confirm. |
Base Path | Enter a path prefix to serve as the unique identifier for the API, such as /hunyuan. Clients will access the API through this path. |
Path simplification | It is recommended to keep it enabled so that the backend receives a concise path. |
4. Click Next to go to the Select Model Service step.
Service Type: Select Single Model Service.
Select Service: Select the service (hunyuan-service) that you created in Step 2 from the drop-down list.
5. Click OK to complete the Model API creation. The system will automatically generate the access route.
Step 4: Creating a Consumer
A consumer represents the identity of a client that invokes APIs and requires authentication credentials to be configured.
1. In the left sidebar, click Consumer Management > Consumers.
2. On the Consumers page, click New.
3. In the Create Consumer window, configure the settings by referring to the following table.
Parameter | Description |
Consumer name | Specify a custom name, such as my-app. |
Consumer group | You can leave this unselected for now and associate it later in the consumer group. |
Secret selection | Click New Key to create a key of the API Key type for authenticating this consumer when it calls the gateway. Note the generated Key. |
4. Click OK to complete the consumer creation.
Step 5: Creating and Authorizing a Consumer Group
A consumer group is used to group consumers and uniformly grant them permissions to access the model API.
1. In the left sidebar, click Consumer Management > Consumer Groups.
2. On the Consumer Groups page, click New.
3. Configure the basic information for the consumer group, and in the Consumers option, associate the consumer (my-app) that you created in Step 4.
4. After creation, locate the group, switch to the Authorized Model APIs card, and click the Add Authorization button.
5. On the authorization page, grant the model API (hunyuan-api) created in Step 3 to this consumer group.
Step 6: Obtaining the Access Address and Initiating a Call
After completing all configurations, you can invoke the large model through the gateway address.
1. Obtain the gateway entry address: Go to Basic Information > Instance Information and view the "Public Network CLB Address" or "Private Network Private Link Address" on the Network Configuration card.
2. Obtain the route access address:
Go to Model Management > Model API and click the name of the API you created in Step 3.
Click the Route Management tab and copy the "Request Path". The complete access address format is:
protocol://gateway-entry-address/request-path.3. Initiate the call: Use the curl command or any HTTP client to initiate a request by referring to the following example. Replace <Access Address> with the complete URL obtained in the previous step, replace <API_KEY> with the API Key created for the consumer in Step 4, and replace <MODEL_NAME> with the model selected in Step 2.
curl -i -X POST <Access Address> \\-H "Content-Type: application/json" \\-H "Authorization: Bearer < API _KEY>" \\-d '{"model": "<MODEL_NAME>","messages": [{"role": "user", "content": "Hello, please introduce yourself."}],"stream": false}'
4. View the result: If everything is configured correctly, you will receive a JSON-formatted response from the Hunyuan large model.
Help and Support
Was this page helpful?
You can also Contact sales or Submit a Ticket for help.
Help us improve! Rate your documentation experience in 5 mins.
Feedback