Members and Departments
Download
Focus Mode
Font Size
Member and department data in the WorkBuddy Enterprise admin console comes from the Tencent Unified Identity (OneID) platform. Enterprise administrators can centrally manage the organizational structure (departments and members) in OneID, then sync data from OneID to WorkBuddy through the organization sync capability in the admin console, and finally grant client access permissions to synced members individually or in batches.
This document guides you through the following operations:
Jump from the WorkBuddy admin console to the OneID admin console.
View departments and members in OneID, and add new members.
Sync the OneID organizational structure to WorkBuddy.
Grant members the permission to use the WorkBuddy client.
Note:
The "Members & Departments" page only provides browsing and authorization management capabilities. To add, modify, or delete members and departments, go to the OneID admin console. For details about the sync capability, see Organizational Structure Sync.
Operation Steps
Step 1: Go to the Members and Departments Page
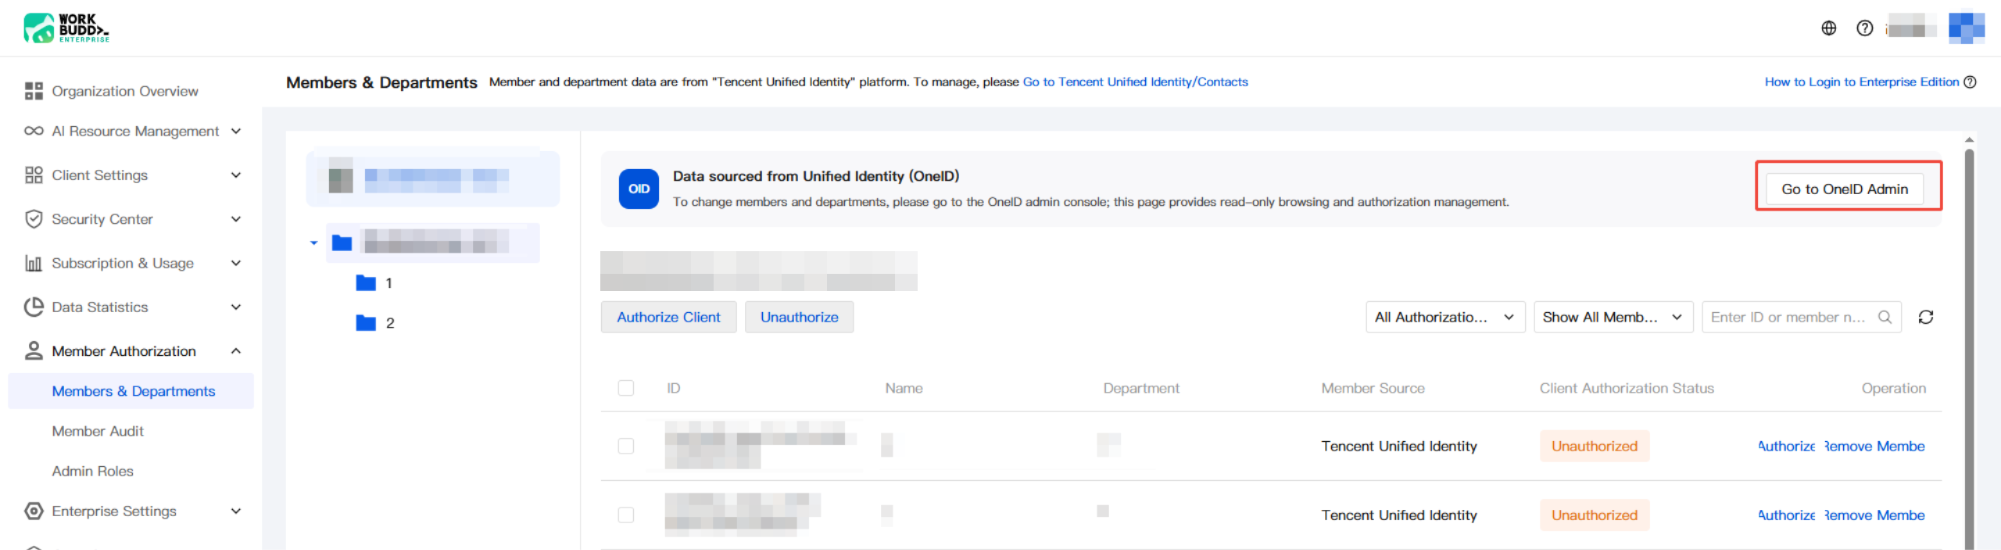
Log in to the WorkBuddy Enterprise admin console, and go to Member Authorization > Members & Departments in the left sidebar to access the Members & Departments management page. A notice at the top of the page indicates that member and department data comes from Tencent Unified Identity (OneID).
Click "Go to OneID Admin" in the upper-right corner of the page to jump to the OneID application platform for organizational structure management.
Note:
On first use, the admin console may not have any member data yet. You need to maintain departments and members in OneID first, and then return to this page to sync the organizational structure.
Step 2: View Departments and Members in OneID
After entering the OneID application platform, go to Contacts > Organizational Structure in the left sidebar. The department tree of the current enterprise is displayed in the middle of the page, and the member list of the selected department is displayed on the right, including names, departments, email addresses, phone numbers, and other information.
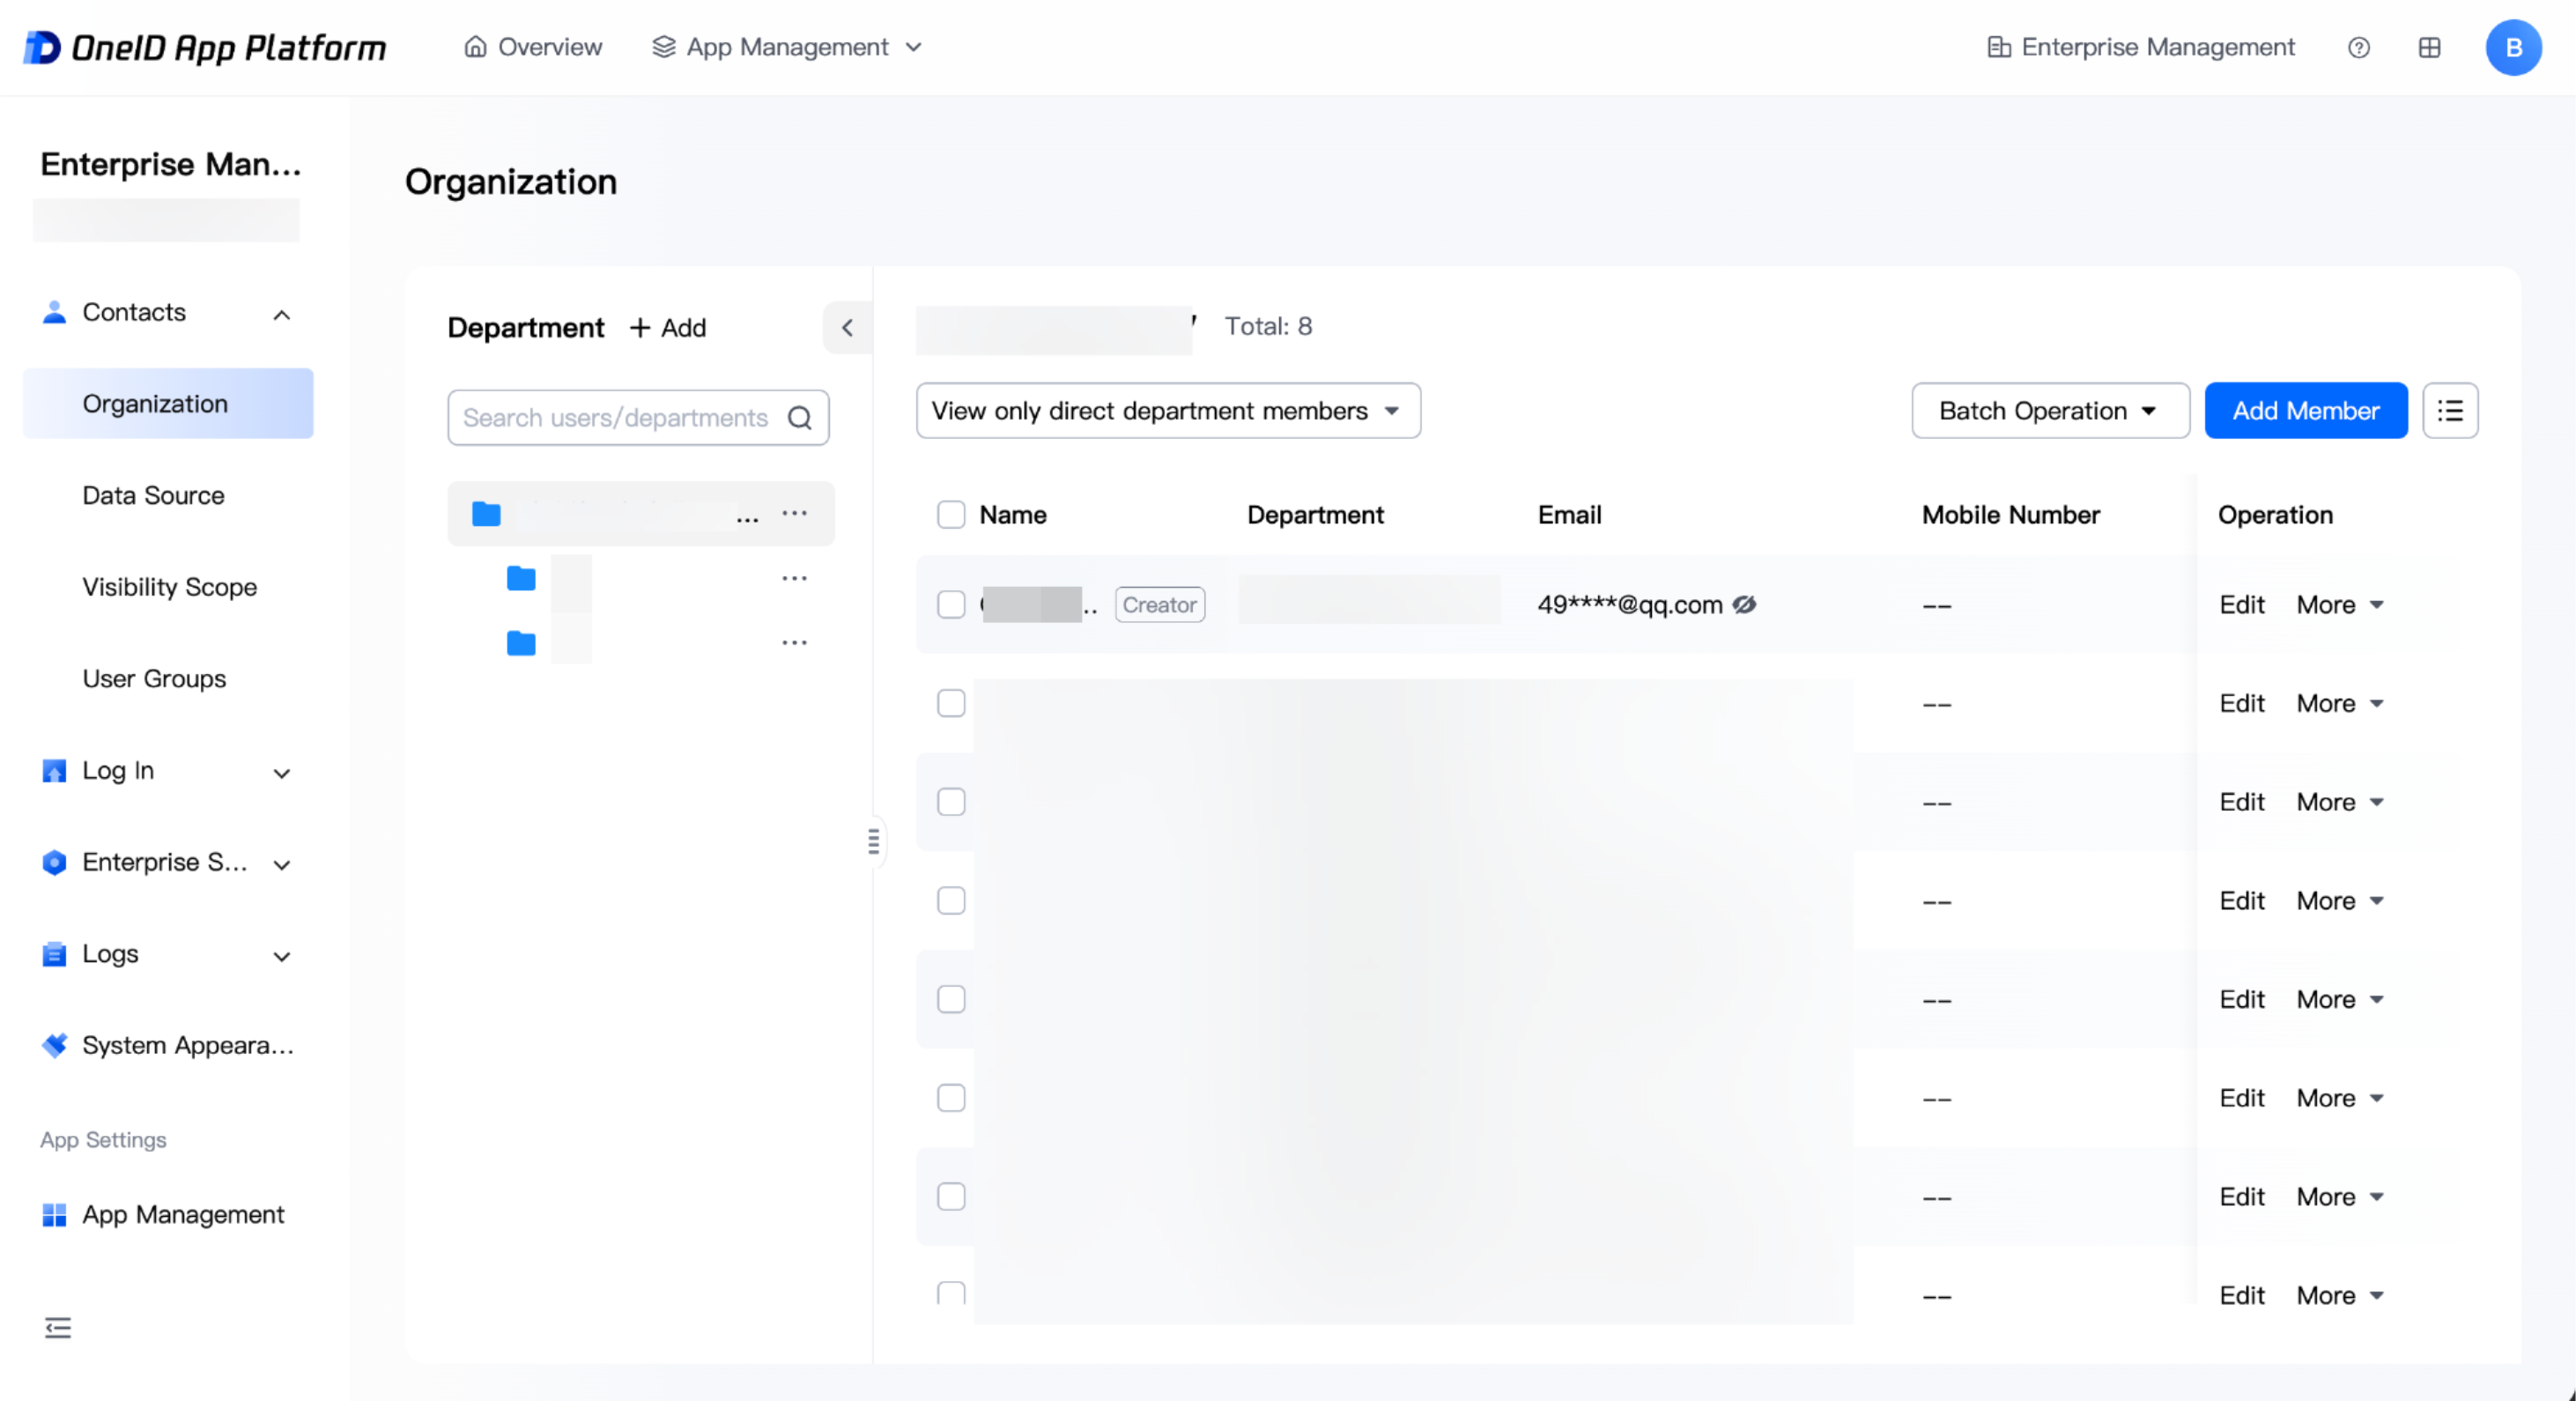
On this page, you can perform the following operations:
Operation | Description |
Add a department. | Click "+ Add" at the top of the department tree on the left to create a department or sub-department under the current enterprise. |
Add members. | Click "Add Member" in the upper-right corner of the member list on the right. The "Add Personnel" side panel appears. For details on how to fill in the fields, see Step 3. |
Batch Operations | After selecting members, click "Batch Operation" to adjust departments or delete members in batches. |
Editing Members | Click "Edit / More" on the right side of a member row to modify member information or remove the member from the current department. |
Step 3: Add Members in OneID
In the upper-right corner of the Contacts > Organizational Structure page, click Add Member. An "Add Member" sidebar appears on the right side of the page. Fill in the member information as prompted, and then click OK to complete the addition.
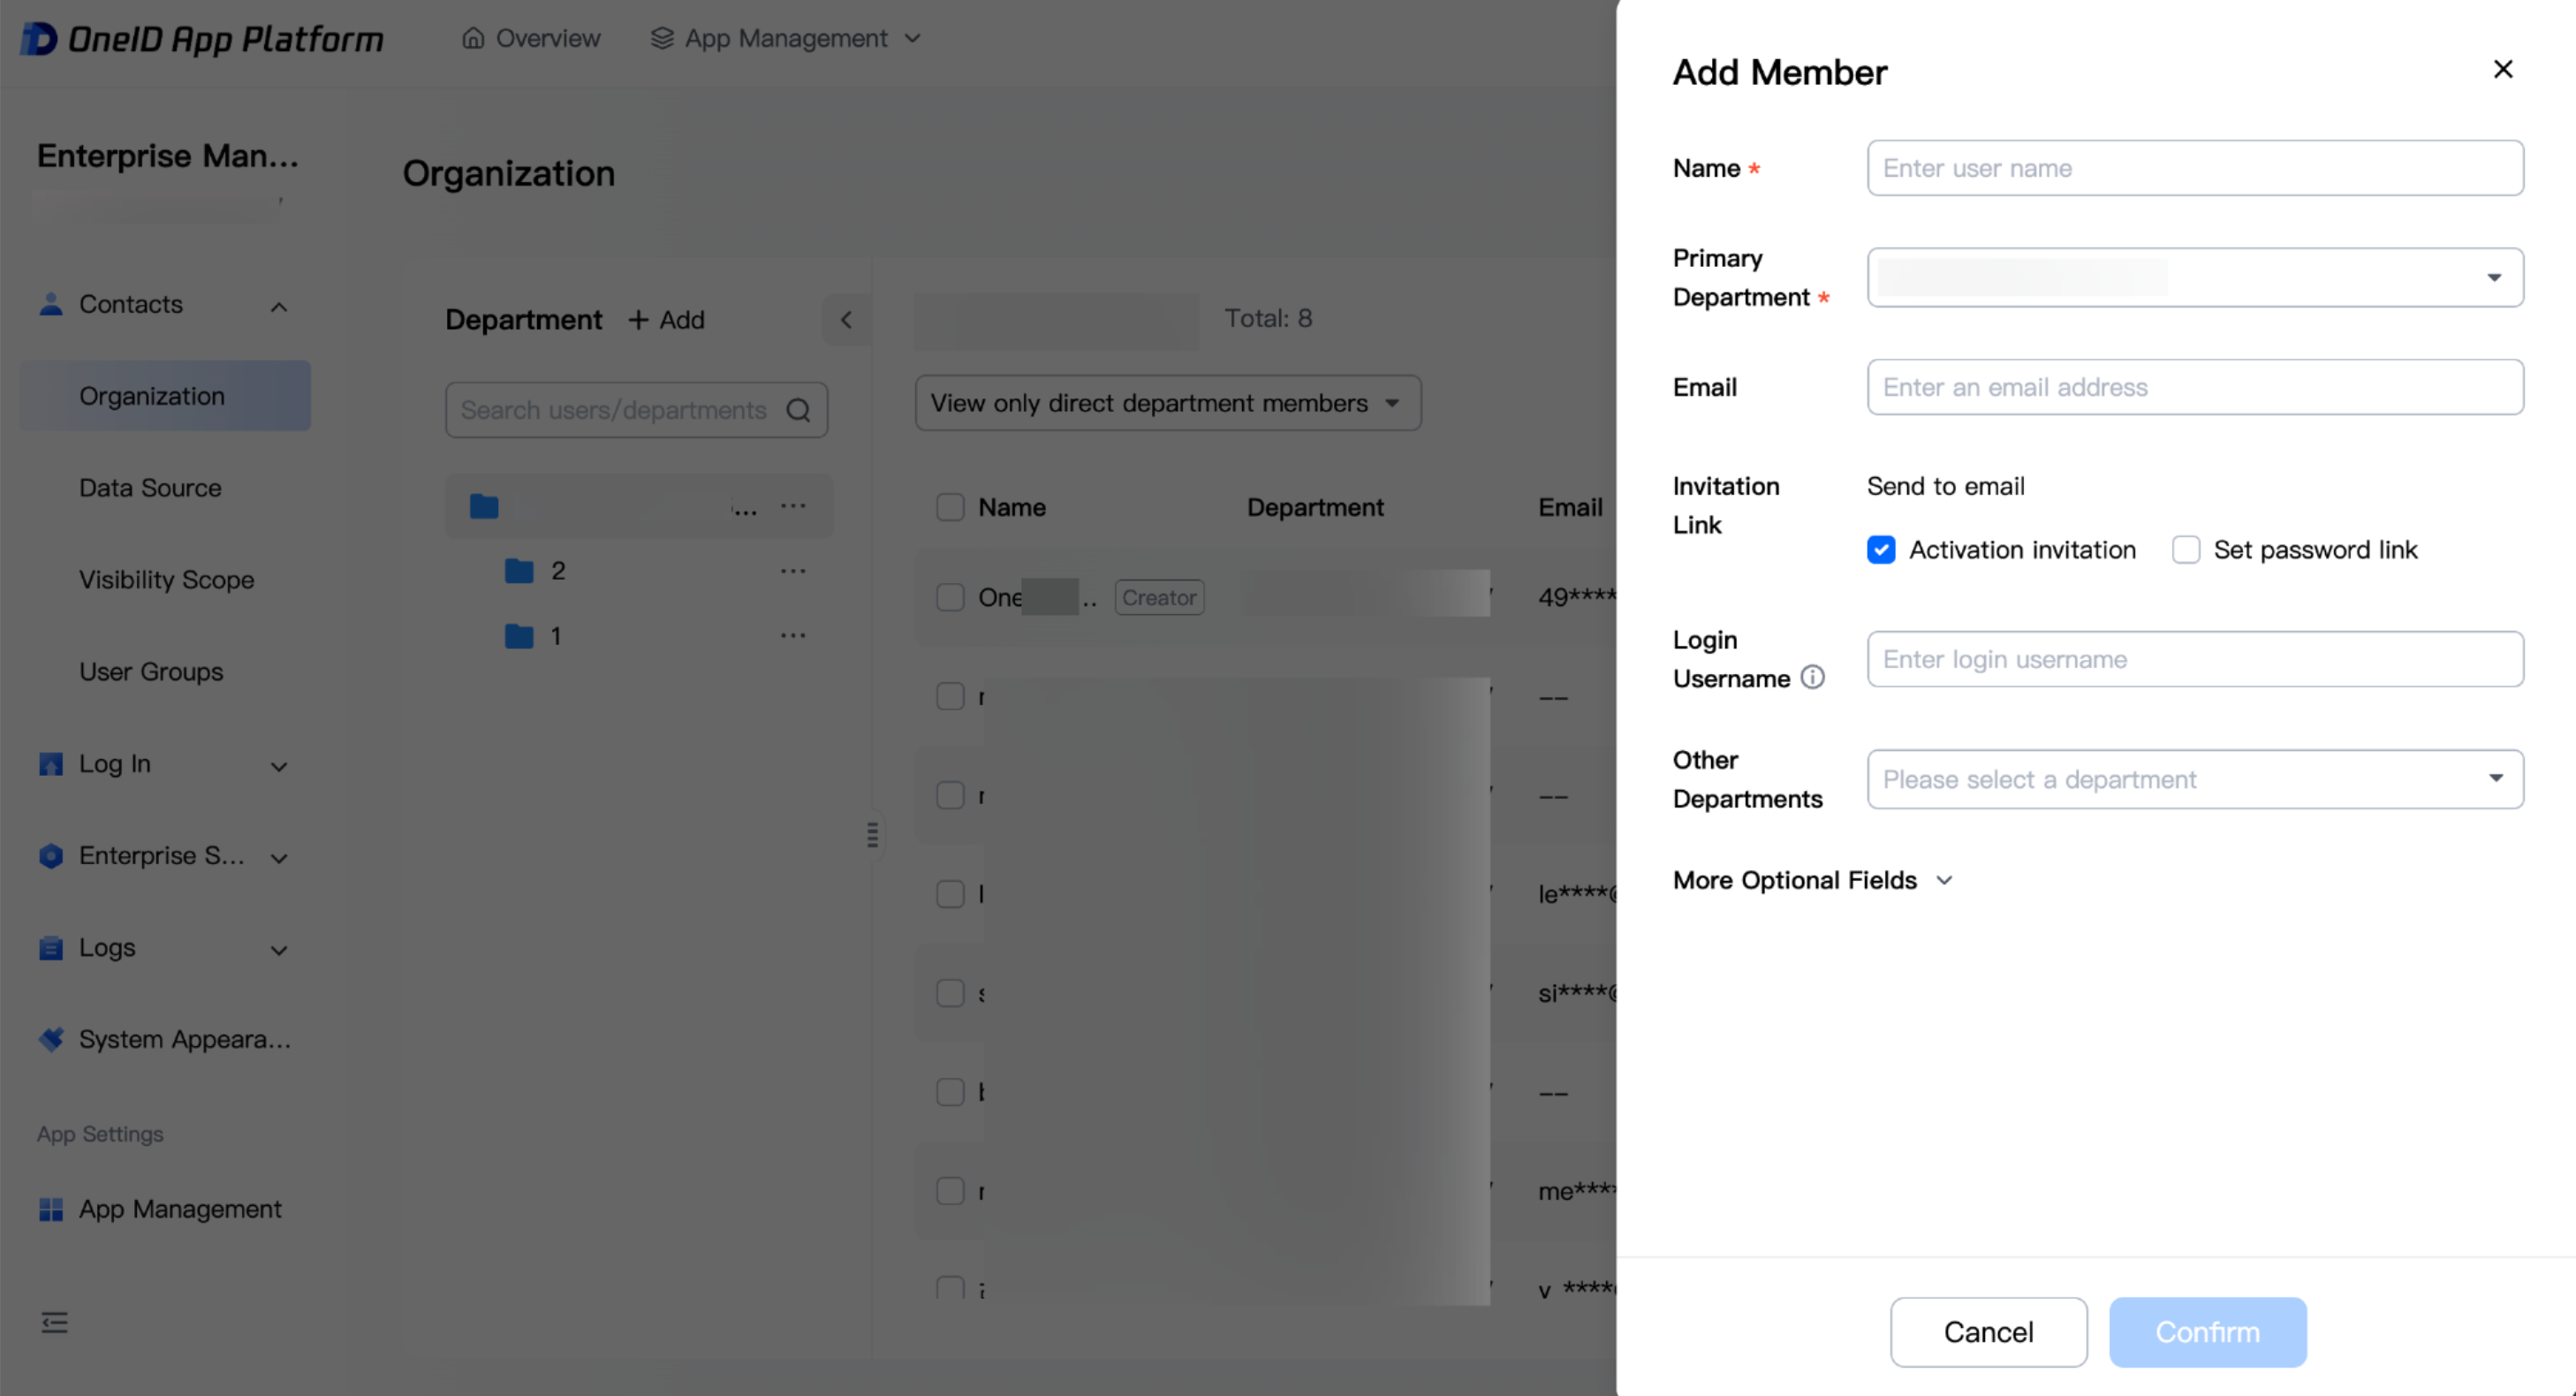
Field descriptions are as follows:
Field | Required | Description |
Name | Required | The member's real name, displayed in the WorkBuddy client and admin console. |
Primary department | Required | The primary department to which the member belongs. Select an existing department from the drop-down list. A member can have only one primary department. |
Email | Optional. | The email address used by the member to log in. If "Activation Invitation" is selected, OneID will send an activation invitation email to this email address. |
Invitation link | Optional. | Selectable invitation methods: Activation Invitation (an activation invitation email is sent to the specified email address, and the member sets a password through the email to log in); Password Setup Link (a password setup link is generated and can be copied and sent to the member). |
Login username | Optional. | The username used for password-based login. If left blank, the email address is used for login by default. |
Other departments | Optional. | Specify additional associated departments for the member (a member can belong to multiple departments, but can have only one primary department). |
User ID | Optional. | The unique identifier of the user. It cannot be modified after being filled in. It is recommended to use an email address or mobile number as the user ID. |
Employee ID | Optional. | Internal employee ID, used for alignment with the HR system. |
Position | Optional. | The member's job title, displayed in the member details. |
Hire date | Optional. | The member's onboarding date, displayed in the member details and used for filtering. |
Note:
"User ID" is the unique identifier of a user. Once set, it cannot be modified. We recommend using an email address or phone number as the User ID for easier unified management.
Fill in at least one of the email address and phone number, which will be used to receive a verification code when members log in to the WorkBuddy client. The specific login method depends on the authentication source configured by the enterprise in OneID.
Step 4: Sync the OneID Organizational Structure to WorkBuddy
After maintaining departments and members in OneID, return to the WorkBuddy Enterprise admin console, go to Open & Integration > Organizational Structure Sync in the left sidebar, and click "Manual Sync" in the upper-right corner to sync the latest department and member data from OneID to WorkBuddy.
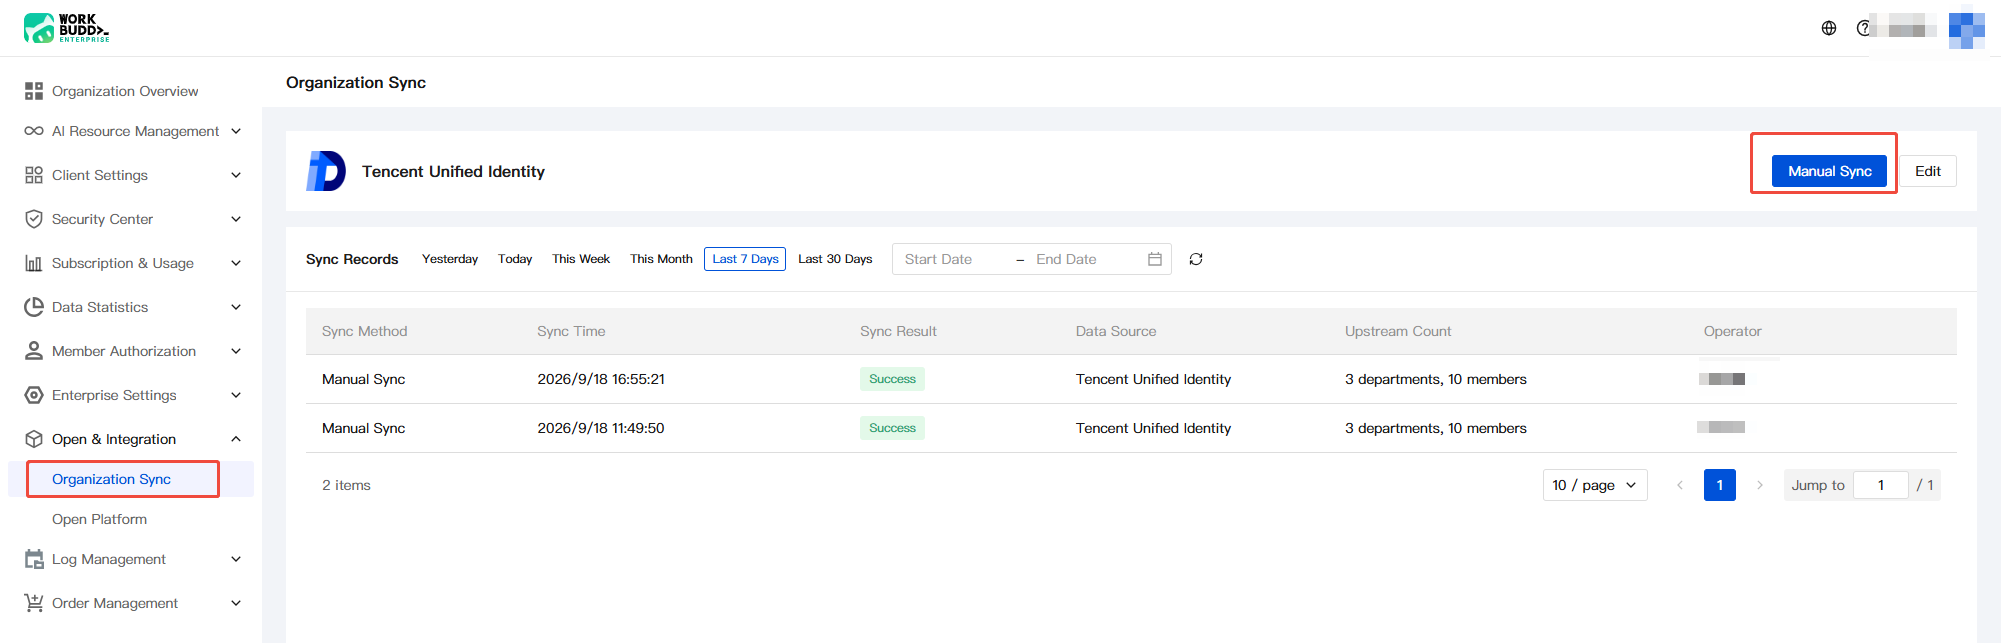
Sync record list field descriptions:
Field | Description |
Synchronization method | Trigger method of this synchronization, for example, "manual synchronization". |
Synchronizing time | Execution time of this synchronization. |
Synchronization result | "Success" indicates that the synchronization is complete. If it fails, check the error message or contact technical support. |
Data Source | Source of this synchronization, currently "Tencent Unified Identity". |
Number of Upstreams | Number of departments and members involved in this synchronization. |
Operator | Admin account that triggered this synchronization. |
Note:
Organizational structure sync is a full sync: members/departments added, edited, or deleted in OneID will overwrite the corresponding data in WorkBuddy after the sync.
Syncing only pulls member information into WorkBuddy and does not automatically grant client access permissions. For authorization operations, see Step 5.
Step 5: Grant Members Permission to Use the Client
After completing the organizational structure sync, go to Member Authorization > Members & Departments. Newly synced members will appear in the member list with the client authorization status set to "Unauthorized" by default. An administrator must explicitly authorize them before they can log in to and use the WorkBuddy client.
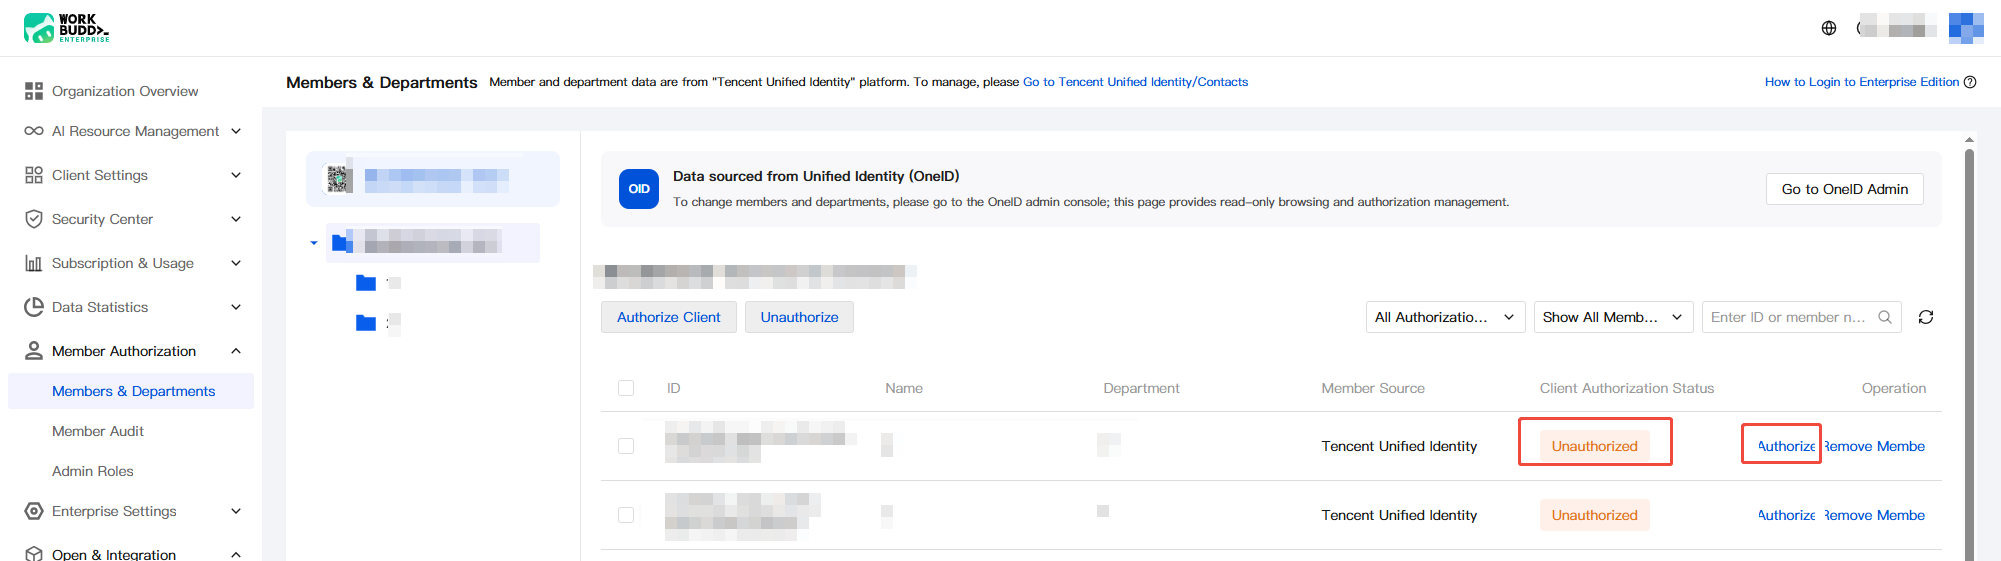
You can choose any of the following methods to authorize members:
Individual Authorization: Locate the target member in the member list and click "Authorize" on the right side of their row to update the member's client authorization status from "Unauthorized" to "Authorized".
Batch Authorization: Select multiple members in the member list (or select the checkbox in the header to select all entries on the current page), click "Authorize Client" in the upper-left corner of the list, and then authorize the selected members in batches.
Revoke Authorization: Select the target members and click Revoke Authorization to revert the client authorization status of the selected members to "Unauthorized" in batches.
Remove Member: Click Remove Member on the right side of the member row to remove the member from WorkBuddy. This operation does not delete the member from OneID. It only removes the record on the WorkBuddy side, and the next sync will pull it back.
The filter area at the top of the page supports quick filtering by authorization status and member scope, as well as searching by ID or member name:
All Authorization Statuses: Switch to view "Authorized / Unauthorized / All".
Show All Members: Switch to filter members by primary department or sub-department.
Search Box: Enter an ID or member name to quickly search.
Note:
After being authorized, members can log in to the WorkBuddy client using the login methods configured in OneID (email Captcha / phone number Captcha / SSO).
The number of enterprise client authorizations is limited by the subscription seats. To expand the seats, go to Subscription & Usage > Subscription Management.
Help and Support
Was this page helpful?
You can also Contact sales or Submit a Ticket for help.
Help us improve! Rate your documentation experience in 5 mins.
Feedback