Config MCP
Download
Focus Mode
Font Size
Introduction
MCP (Model Context Protocol) is designed to address the need for seamless integration between large language models (LLMs) and external data sources and tools. It helps models obtain richer contextual information by standardizing how AI systems interact with data sources, thereby generating more accurate and relevant responses. Its main features are as follows:
Context sharing: Applications can provide models with required contextual information (such as file contents and database records) through MCP, enhancing the models' understanding capabilities.
Tool exposure: MCP allows applications to expose features (such as file read/write and API calls) to models, which can then invoke these tools to complete complex tasks.
Composable workflows: Developers can use MCP to integrate multiple services and components, building flexible and scalable AI workflows.
Security: By running on a local server, MCP avoids uploading sensitive data to third-party platforms, ensuring data privacy.
CodeBuddy IDE supports MCP Server configuration, extending the features of your applications.
Configuration
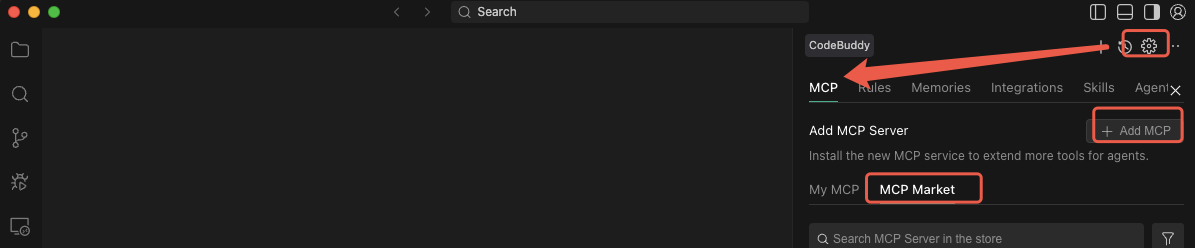
1. In the upper right corner of the sidebar conversation panel, click the CodeBuddy Settings button.
2. Switch to the MCP tab. Currently, you can configure custom MCP Servers and install MCP Servers from MCPMarket with one click.
One-Click Installation of MCP Server
MCP Market provides a large number of MCP Servers, and you can install them with one click.
Select an MCP Server based on your actual needs and install it with one click. After successful installation, the MCP Server is displayed in green. If installation fails, it is displayed in red.
Custom Configuration of MCP Server
1. On the MCP tab, click the Add MCP button on the right.
2. In the JSON configuration file, add the MCP Server configuration content, for example:
{"mcpServers": {"python-tools": {"type": "stdio","command": "python","args": ["-m", "my_mcp_server"],"env": {"PYTHONPATH": "/path/to/tools"},"description": "Python toolset"}}}
Usage
After the MCP Server is installed successfully, you can click the Try to Run button on the right of the MCP Server to verify and use it. Alternatively, you can directly enter task requirements in Craft Agent, and the Agent will analyze your requirements and then invoke MCP Server tools to complete your tasks.
Help and Support
Was this page helpful?
You can also Contact sales or Submit a Ticket for help.
Help us improve! Rate your documentation experience in 5 mins.
Feedback