Connector Management
Download
Focus Mode
Font Size
Connect external services to enable the Agent to read and write data from platforms such as GitHub, Figma, and Tencent Docs.
Overview
Connector management provides enterprises with unified external service integration capabilities. By configuring connectors, an enterprise's AI Agent can securely access and operate data and capabilities on third-party platforms. The system includes built-in official connectors such as GitHub, Notion, and Supabase, and also allows administrators to create custom connectors based on business needs.
Each connector encapsulates complete integration configurations, including authentication credentials, MCP (Model Context Protocol) server settings, tool permission filtering, timeout policies, and custom request headers. Once created, the connector is available within the organization, allowing members to use the corresponding external service capabilities through the Agent without individual configuration.
Quick Start
Create a custom connector in three steps:
1. Fill in basic information: Define the connector's identifier, display name, and description.
2. Configure authentication and credentials: Select an authentication method and enter the required credential parameters.
3. Set up the MCP server: Specify the upstream MCP Server address.
After the above steps are completed, the new connector appears in the connector list with a status of Pending enablement.
Creating a Custom Connector
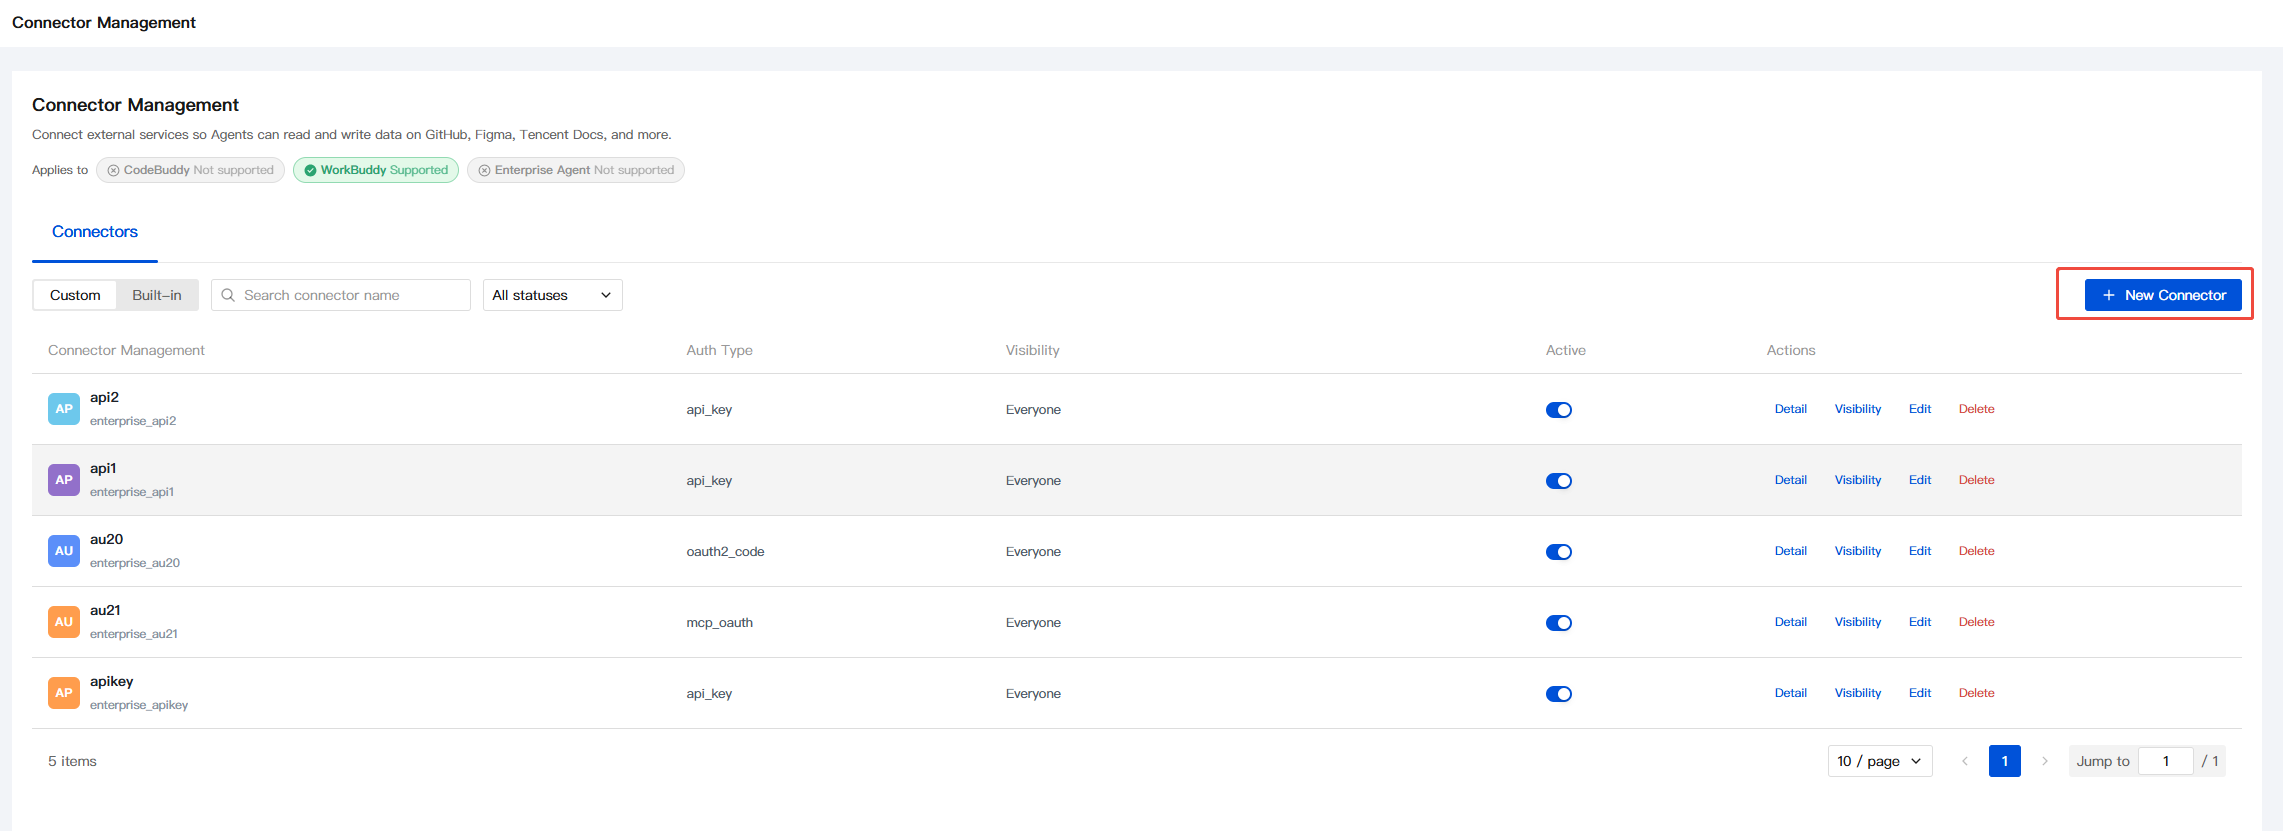
Go to the Enterprise Admin Console and navigate to the AI Resource Management > Connector Management page. Click + New Connector in the upper right corner to enter the creation wizard. The wizard consists of three steps. Complete them in order and save.
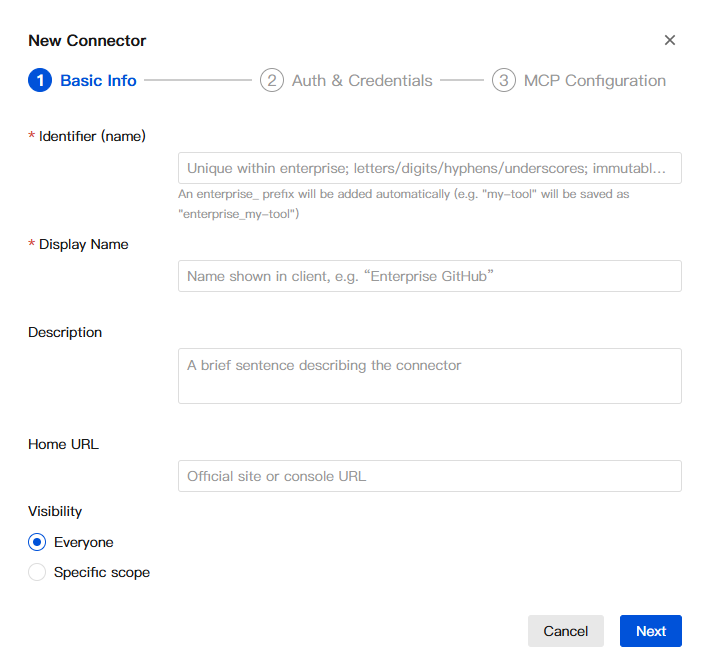
Step 1: Fill in Basic Information
Fill in the connector's identity information:
Identifier (name): A unique English identifier for the connector. Only letters, numbers, hyphens, and underscores are supported. It cannot be modified after creation. The system automatically adds the
enterprise_ prefix. For example, if you enter my-tool, the actual stored value is enterprise_my-tool.Display name: A user-facing name, such as "Enterprise GitHub".
Description: Briefly describe the purpose of this connector in one sentence.
Home URL: The official website or admin console address of the connected service (optional).
After confirming that everything is correct, click Next.
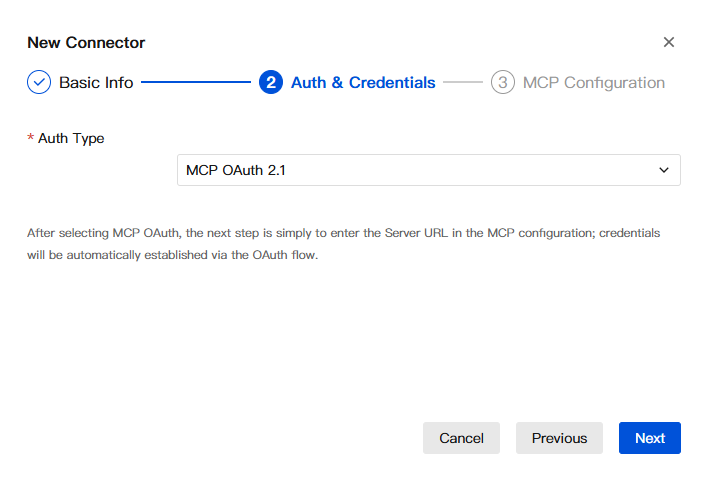
Step 2: Configure Authentication and Credentials
Select an authentication type that suits the target service. The system supports three methods:
MCP OAuth 2.1
After selecting this method, you only need to enter the MCP Server URL in the third step. Authentication credentials are automatically established through the standard OAuth flow, so you do not need to manually enter a Client ID or Secret.
Applicable to: servers that have implemented the MCP OAuth 2.1 specification.
OAuth 2.0(Authorization Code)
Applicable to the standard OAuth 2.0 authorization code flow. Enter the
Redirect URL shown at the bottom into the Callback URL field (callback allowlist) required by the third-party application.After completing the configuration, continue filling in the following fields in the enterprise console:
Client ID: The client ID obtained by the application when the application registers on the third-party platform.
Client Secret: The corresponding client secret.
Authorization URL: The third-party OAuth authorization endpoint address.
Token URL: The token exchange endpoint address.
Scopes: The requested permission scopes, separated by commas (for example,
read,write).User Info Endpoint: The API endpoint for obtaining user information.
User Info Name Path: The path to the username field in the response JSON (
login or name).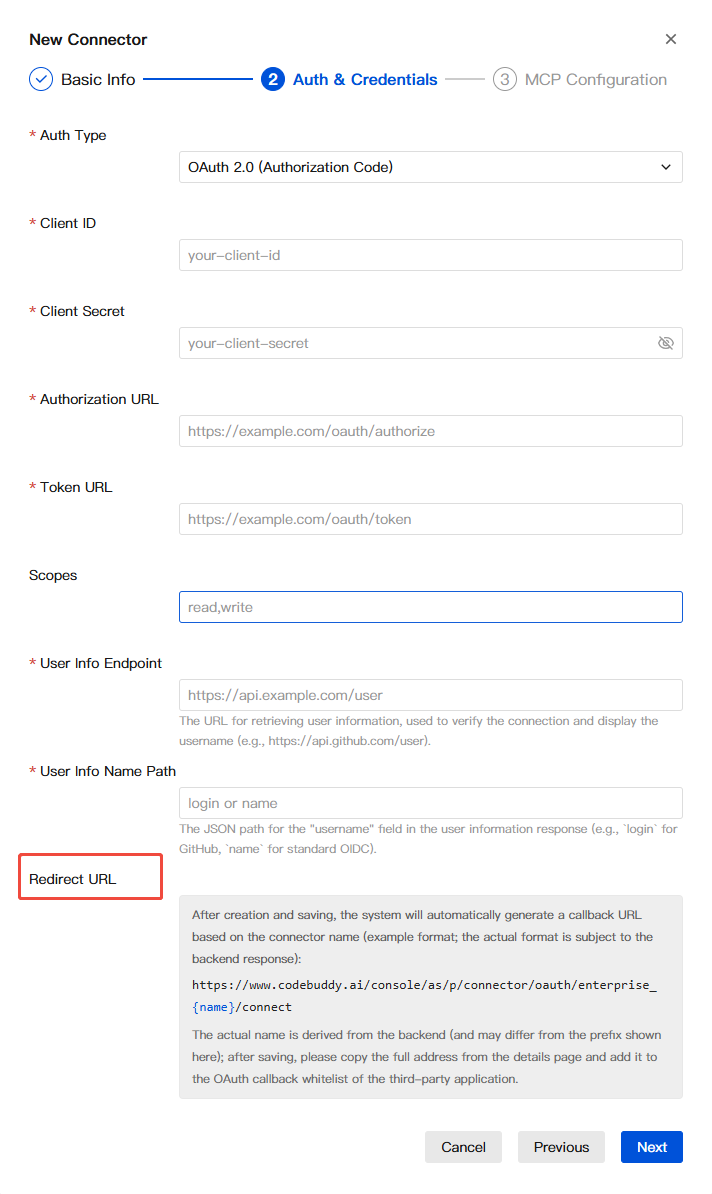
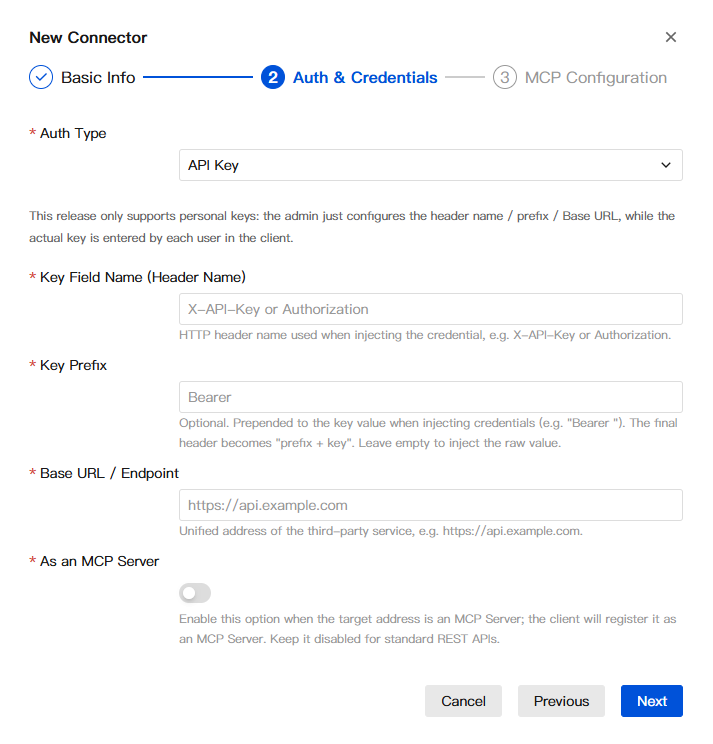
API Key
The simplest authentication method. You only need to enter:
Header Name: The HTTP request header field name (default:
X-API-Key). It can also be set to other values such as Authorization. Users complete authentication by entering the corresponding header value when using the API.Applicable to: services that use static API keys for authentication (such as some internal API Gateways).
Step 3: Configure the MCP Server
Enter the MCP protocol access address for third-party APIs. This address can be natively provided by the service provider, hosted by the platform, or deployed by the enterprise itself.
Enter the MCP Server URL, for example:
https://docs.qq.com/openapi/mcp. After you enter it, the system will automatically generate the Gateway and MCP-related configurations based on this address.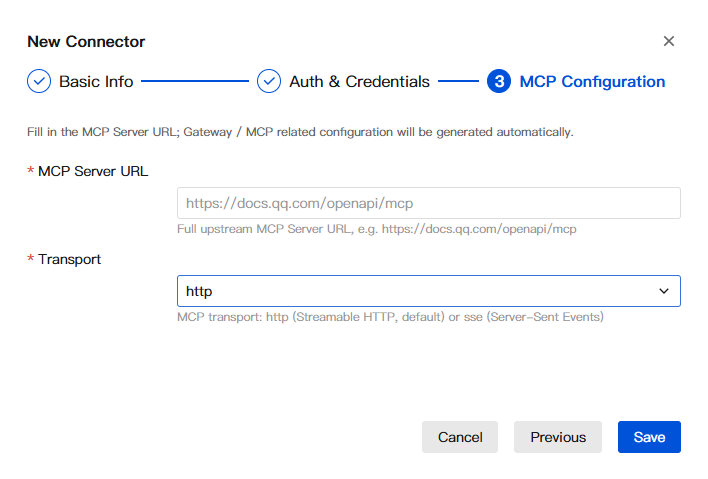
After completing the form, click Save. The connector is then created.
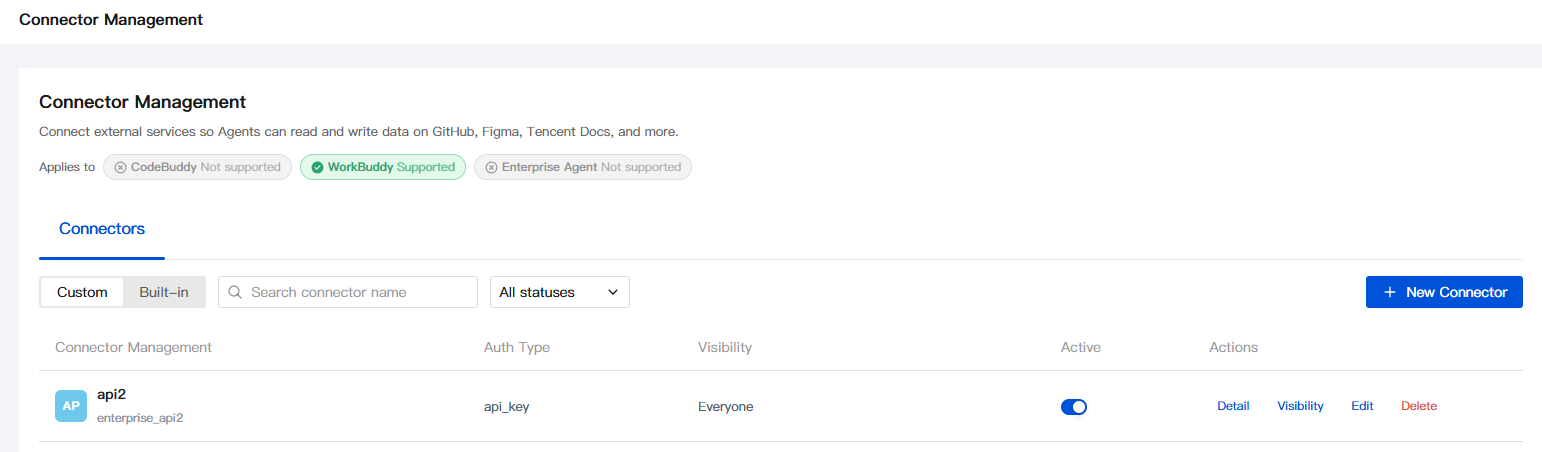
Managing Existing Connectors
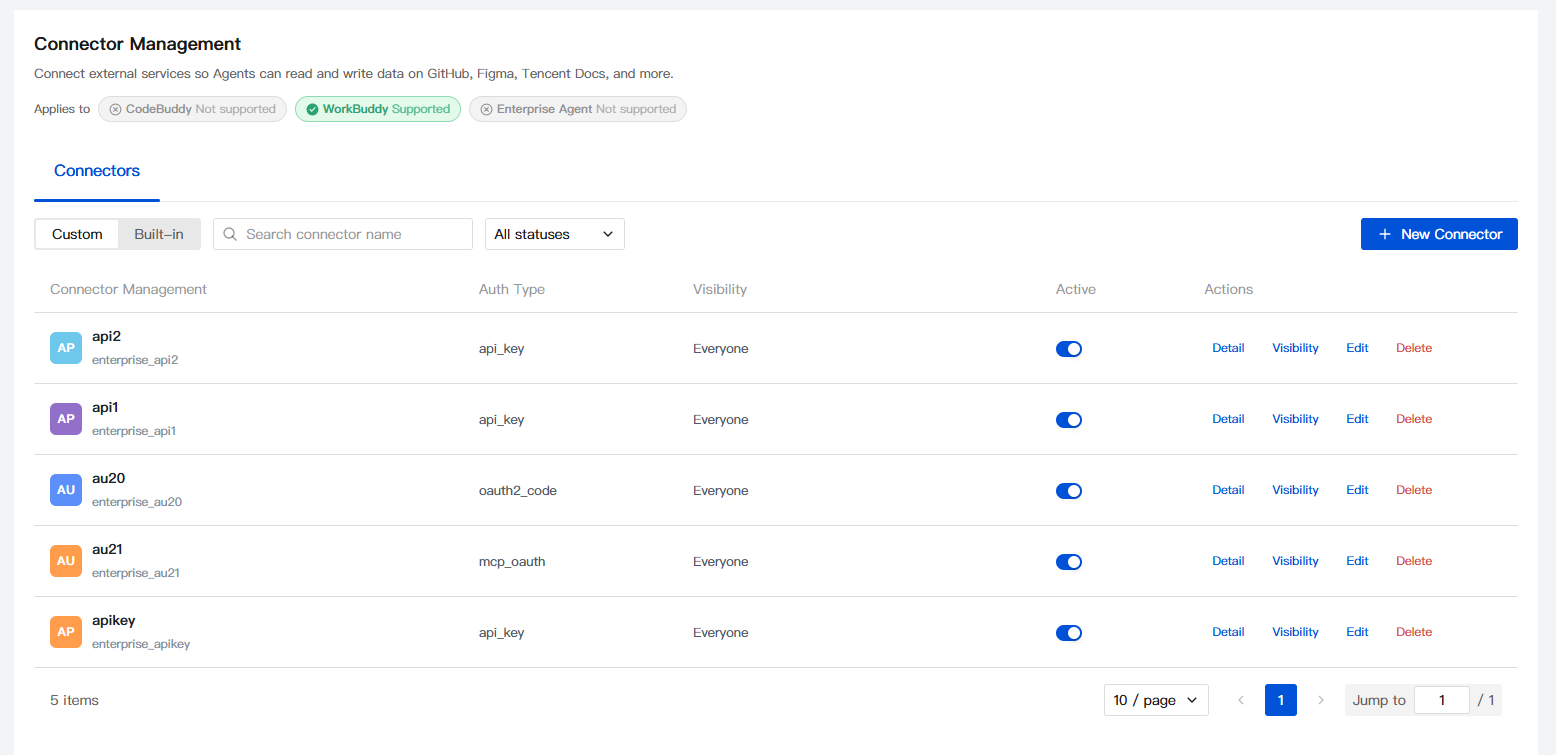
Go to the Connector Management page to view all configured connectors. The page displays basic information for each connector in card format:
Icon + Name: The connector identifier and display name.
Tag:
official indicates a built-in connector. No tag indicates a custom connector.Authentication Type: Displays the underlying authentication protocol type (such as
mcp_oauth or oauth2_code).Actions: Custom connectors support actions such as enable, edit, and delete. The identifier (name) cannot be modified during editing.
The top of the page provides the following filtering capabilities:
Dimension | Option | Description |
Source | Official reference / Custom | Distinguish between system built-in and administrator-created |
Status | Enabled | Display only activated connectors. |
Keyword | Search box | Fuzzy match by connector name |
Viewing Connector Details
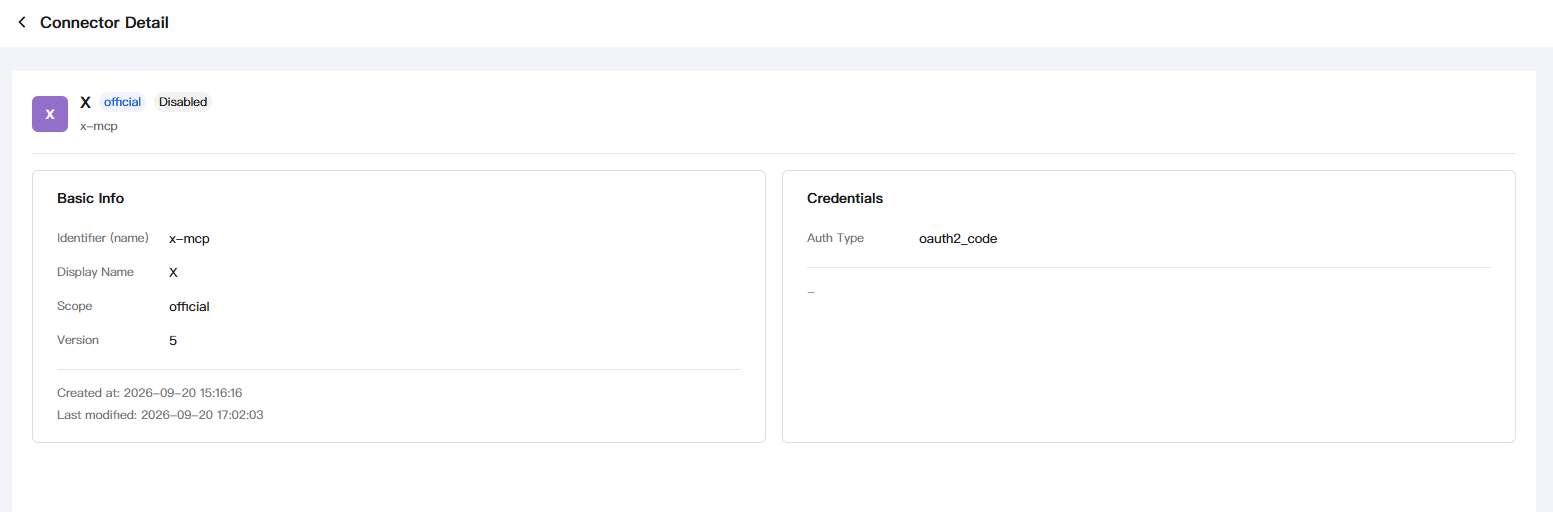
Click Details on a connector card to go to the details page, which displays the complete configuration information in a two-column layout:
Basic information
Field | Description |
Identifier (name) | Unique identifier within the system |
Display Name | Name displayed to users |
Description | Description of the connector's purpose |
Scope | Permission level (such as official) |
Version | Connector version number |
URL | Associated service address |
Created / Last Modified | Timestamp record |
Credential Configuration
Field | Description |
Authentication Type | Current authentication method (such as oauth2_code) |
MCP Configuration
Displays the complete configuration information for connecting a connector to an upstream MCP Server, divided into two sections: MCP Server Configuration and Gateway Configuration.
MCP Server Configuration
Field | Example Value | Description |
MCP Server URL | https://docs.qq.com/openapi/mcp | Access address of the MCP service, which is the address entered in step 3 |
Transport | streamable_http | MCP communication transport type |
Server Name | enterprise_test | Logical identifier of the MCP server |
Path | /openapi/mcp | Path suffix of the MCP protocol endpoint |
Gateway Configuration
The Gateway route configuration automatically parsed and generated by the system based on the MCP Server URL:
Field | Example Value | Description |
Module Name | enterprise_test | Gateway module identifier |
Upstream Host | docs.qq.com | Host address of the upstream service (domain name) |
Proto | https | Communication protocol of the upstream service |
Path Prefix | /openapi/mcp | Path prefix for request forwarding |
Injector Type | default | Injector type, automatically handled based on the authentication method configured in step 2 |
Note:
This content is displayed only on the details page of custom connectors.
Notes and Important Tips
Information Collection and Use
Collection Item | Required | Purpose |
Enterprise account information (login credentials) | Yes | Log in to the enterprise management console to create and manage connectors. |
Connector identifier (name) | Yes | Unique identifier within the system, used to reference and invoke the connector, and cannot be modified after creation. |
Authentication credentials (Client ID, Client Secret, API Key, and so on) | Yes | Complete identity authentication with the third-party service, enabling the Agent to access external APIs as a proxy. |
MCP Server URL | Yes | Specifies the access endpoint of the upstream MCP service. The connector communicates with the third-party service through this address. |
Custom request header configuration | No | Fill in this field only when the target service requires additional HTTP headers, such as X-Custom-Header. |
Homepage URL | No | Provided only when the administrator wants to associate an official homepage with the connector. It is used for display and redirection. |
Type determination criteria:
Required: Information that must be provided when a connector is created (such as the identifier, authentication credentials, and MCP Server URL). Without this information, the connector cannot function properly.
Optional: Information that is involved only when the administrator needs additional customization or display, such as custom request headers or the homepage URL.
Permission Boundaries
Each connector is authorized independently, and the credentials and access scopes of different connectors do not affect each other.
The connector performs operations under the identity of the third-party account associated with the configured authentication credentials, and the access scope does not exceed the existing permissions of that account in the third-party service.
The connector does not actively fetch third-party data on a schedule. It initiates a request only when the Agent triggers a call through a member conversation.
Tool permissions for a connector can be filtered through the Gateway configuration, and unauthorized tools are not exposed to the Agent.
Security Tips
In API Key mode, the Header value entered by a member when a connector is used is the access key for the third-party service. Generate credentials by applying the principle of least privilege.
Administrators can disable a connector at any time by using a switch. Once the connector is disabled, all Agent calls that depend on it immediately become invalid.
Regularly check the validity period and status of connector authentication credentials, and rotate expired tokens or keys in a timely manner.
Points Consumption Reminder
Read and write operations of the connector itself do not consume credits. The client consumes credits when it understands, summarizes, and generates responses based on the external data returned by the connector during a conversation.
Third-Party Sharing
The authentication credentials and MCP Server URL of a connector point to a third-party service. In principle, data interaction involves the client communicating with the third-party service on your behalf.
The connector does not share your credentials with other members or external parties. When a member uses the connector, identity proxying is performed with the unified credentials configured by the administrator.
The availability, data accuracy, and privacy policy of the third-party service are the responsibility of the third-party service itself.
Disclaimer
The access scope and tool permissions of a custom connector are determined by your configuration. The client does not preset any scope. Evaluate carefully before enabling the connector.
All read and write operations on third-party services resulting from connector calls are performed under the identity of the authentication credentials you configured. Before sending data externally or modifying content, confirm the target object and content again.
API changes or unavailability of a third-party service may cause connector features to become abnormal. Check the service status and agreements of the third-party service first.
Usage Recommendations
Before creating a connector, confirm the authentication methods supported by the target service (MCP OAuth 2.1, OAuth 2.0, or API Key), and select the authentication type that matches the target service to reduce debugging costs.
An API Key credential is the key to accessing your third-party account. Keep it secure and avoid entering it on public devices or in shared environments. For connectors that are no longer in use, revoke authorization in a timely manner.
After creating a connector, verify feature normality and tool availability in a test conversation first. After confirming that there are no exceptions, notify team members to use it.
Regularly review the list of enabled connectors and credential validity periods, and remove unused connectors to reduce security risks.
The MCP Server URL supports three deployment methods: provided natively by the service provider, hosted by the platform, or deployed by the enterprise. Select the deployment option with the lowest network latency and optimal stability.
Declaration
The content of this section constitutes an integral part of the Service Agreement and the Privacy Protection guidelines and has the same legal effect. In case of any inconsistency, the original text of the aforementioned agreements shall prevail.
Help and Support
Was this page helpful?
You can also Contact sales or Submit a Ticket for help.
Help us improve! Rate your documentation experience in 5 mins.
Feedback